Table of Contents#
- บทนำ (Introduction)
- Kubernetes Concept ที่เกี่ยวกับ Crossplane
- Crossplane คืออะไร?
- อธิบาย Concept เบื้องต้นของ Crossplane
- บทสรุป (Conclusion)
บทนำ (Introduction)#
Infrastructure as Code (IaC) เป็นหนึ่งใน practice ที่สำคัญสำหรับการพัฒนา software ในยุคปัจจุบัน มันช่วยให้เราสามารถควบคุมเวอร์ชั่นของ infrastructure ได้, ช่วยทำ automation และช่วยให้ reuse ง่ายขึ้น
Crossplane เป็น open-source ที่นำหลักการของ IaC มารวมกับความสามารถของ Kubernetes ทำให้เราสามารถสร้าง control plane ขึ้นมาเพื่อจัดการ infrastructure ได้โดยใช้ Kubernetes APIs (เพราะมันไม่ใช่แค่ CLI-based tools แบบ Terraform, Pulumi, หรือ CDKs - Cloud Development Kits)
ในบทความนี้ผมจะอธิบาย concept พื้นฐานของ Crossplane โดยเน้นภาพประกอบและตัวอย่าง (แต่จะยังไม่มี lab) เมื่ออ่านบทความนี้จบผมหวังว่ามันจะช่วยให้คุณเข้าใจการทำงานของ Crossplane มากขึ้น (มั้งครับ…ผมหวังว่านะ 😂)
Kubernetes Concept ที่เกี่ยวกับ Crossplane#
ก่อนที่จะเข้าใจการทำงานของ Crossplane เราต้องเข้าใจ concept ของ Kubernetes ก่อน ใครเข้าใจอยู่แล้วก็ข้ามได้เลย
Reconciliation Loops#
- Kubernetes มีการทำงานเป็นแบบ declarative
- เราสามารถกำหนด desired state ของ application ผ่าน manifest files (YAML) ได้
- Kubernetes controller จะทำหน้าที่เช็คและปรับ (reconcile) actual state ของ resource ให้ตรงกับสิ่งที่เรากำหนดไว้อยู่ตลอดเวลา เราเรียกกระบวนการนี้ว่า reconciliation loops
- ตัวอย่าง: ถ้าผม deploy application ด้วย deployment manifest ที่ระบุ replica ไว้เป็น 3 มันก็จะพยายามทำให้มี pods อยู่ 3 ตลอดเวลา หากมีเหตุการณ์ที่ทำให้ pods มีจำนวนมากกว่าหรือน้อยกว่า 3 มันก็จะพยายามสร้าง/ลบ pod เพิ่มเพื่อให้ได้ 3 ตามที่เรากำหนดไว้
Custom Resource Definitions (CRDs) และ Custom Controllers#
- เราสามารถสร้าง resource ที่ไม่มีใน Kubernetes ได้ เรียกว่า custom resources (CRs)
- การสร้าง CRs จะต้องกำหนด custom resource definitions (CRDs) ขึ้นมาก่อน เปรียบเสมือนการสร้างแบบ (blueprint)
- เมื่อได้ CRD แล้ว เราก็จะสร้าง resource (CR) นั้นได้ และ Kubernetes จะมองมันเป็น resource เหมือนกับ pods
- เราสามารถจัดการ resource นั้นผ่าน Kubernetes API ได้ เช่น create, get, update หรือ delete
- นอกจากนี้เราจะต้องเขียน custom controller ขึ้นมาด้วยเพื่อบอกมันว่าการดูแล resource นั้นจะต้องทำยังไง
Crossplane คืออะไร?#
Crossplane คือ open source tool ที่ทำให้เราสร้างและจัดการ infrastructure โดยใช้ความสามารถของ Kubernetes ได้ ซึ่งมันก็คือ IaC tool นั่นแหละ เพียงแต่มันต่างกับ IaC tools อื่นตรงที่มันไม่ใช่แค่ CLI-based tool ที่ติดตั้งลงเครื่อง, เขียน code, run คำสั่งเพื่อสร้าง infrastructure แล้วจบ
แต่ Crossplane ผนวกตัวเองเข้ากับ Kubernetes ที่มีความเป็น platform อยู่แล้ว โดยมีทั้ง API ที่เราใช้ create, get, update หรือ delete กับ infrastructure ได้, มี RBAC ที่ใช้กำหนด permissions (สิทธิ์) ได้, มี drift detection จาก reconciliation loops และอื่น ๆ อีกมากมาย ที่สำคัญคือมันอยู่ในโลก cloud native ของ CNCF ดังนั้นจะมี tools มากมายที่พร้อม integrate เข้ามาเสริมอีกเพียบ
และการที่เราจะใช้ Kubernetes จัดการ infrastructure เช่น virtual server, network หรือ database ได้นั้นเราต้องเขียน custom resource definition (CRD) และ custom controller กันแบบหนึ่งต่อหนึ่ง ซึ่งนั่นก็คือสิ่งที่ Crossplane ทำให้เราครับ
อธิบาย Concept เบื้องต้นของ Crossplane#
1) Providers#
Providers คือ plugin ที่ช่วยให้ Crossplane สามารถคุยกับ platform ต่าง ๆ อย่าง AWS, Azure, GCP, Kubernetes, Helm หรือ SQL เพื่อสร้าง resource ขึ้นมาได้ (เหมือนกับ provider ของ Terraform) ซึ่งการติดตั้ง provider ก็คือการสร้าง custom resource definitions (CRDs) สำหรับ resources ต่าง ๆ ของ platform นั้นลงใน Kubernetes ของเรา
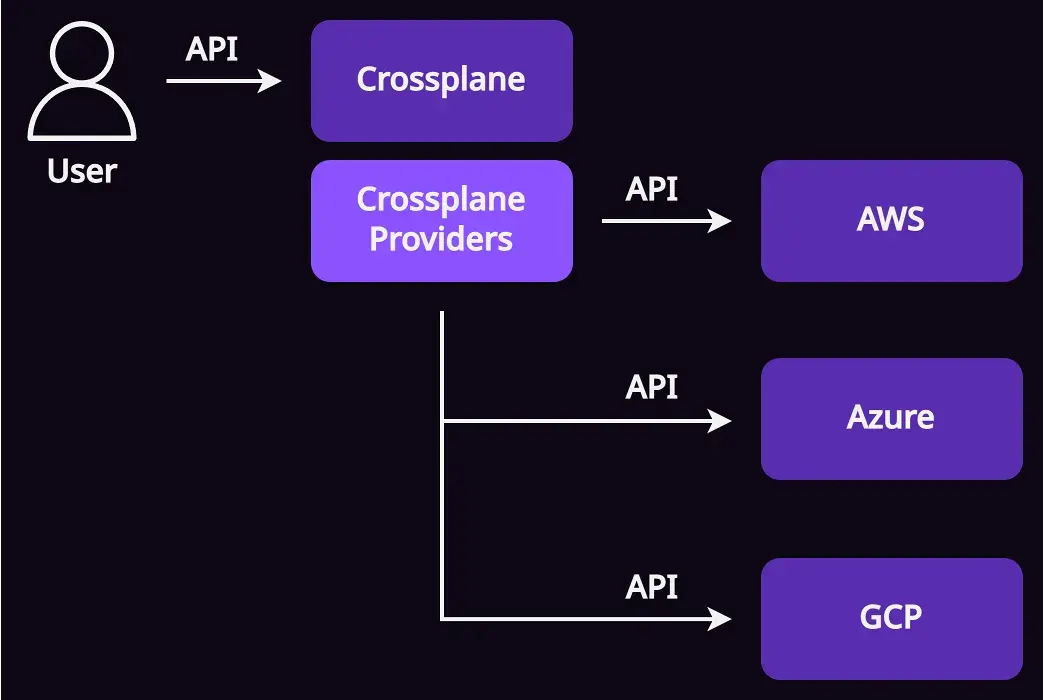
การติดตั้ง Crossplane providers ในปัจจุบันจะเลือกเป็น service เช่น
- AWS Family
- provider-aws-s3
- provider-aws-ec2
- และ services อื่น ๆ
- Azure Family
- provider-azure-compute
- provider-azure-network
- และ services อื่น ๆ
และเค้ายังมี providers อีกหลายตัว สามารถดูได้ที่ https://marketplace.upbound.io/
ตัวอย่าง Provider Manifest สำหรับ AWS EC2
---
apiVersion: pkg.crossplane.io/v1
kind: Provider
metadata:
name: provider-aws-ec2
spec:
package: xpkg.upbound.io/upbound/provider-aws-ec2:v1.3.0
ตัวอย่าง Provider Manifest สำหรับ Azure Compute
---
apiVersion: pkg.crossplane.io/v1
kind: Provider
metadata:
name: provider-azure-compute
spec:
package: xpkg.upbound.io/upbound/provider-azure-compute:v1.0.0
2) Managed Resources (MRs)#
Crossplane ช่วยสร้าง custom resource definitions (CRDs) และ custom controllers สำหรับ cloud resources ไว้ให้แล้ว ถ้าเราสร้าง cloud resources ขึ้นมาด้วย Crossplane เราจะเรียกมันว่า Managed Resources (MRs)
โดย managed resource (MR) แต่ละตัวจะ map กับ cloud resource แบบ 1-1
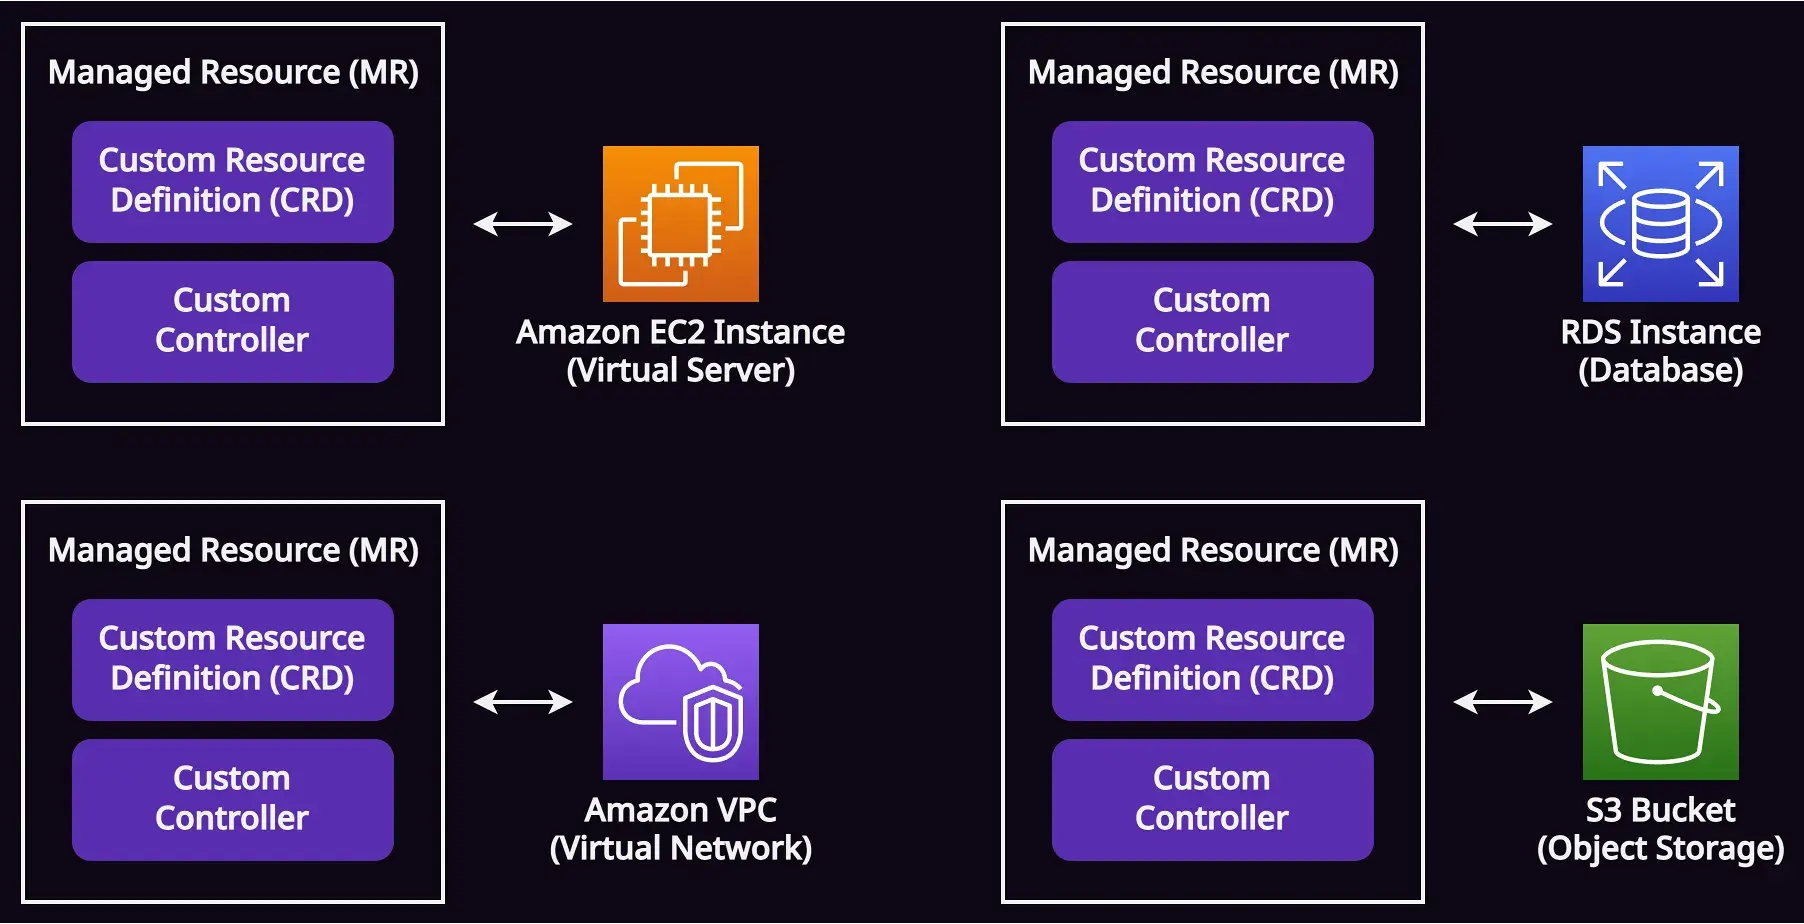
ซึ่งถ้าหากผม configure providers เอาไว้หมดแล้ว ผมสามารถสร้าง S3 bucket ขึ้นมาได้ด้วย manifest นี้
ตัวอย่าง Managed Resource (MR) Manifest สำหรับสร้าง Amazon S3 Bucket
---
apiVersion: s3.aws.upbound.io/v1beta1
kind: Bucket
metadata:
generateName: nopnithi-bucket-
spec:
forProvider:
region: ap-southeast-1
และสามารถใช้ Kubernetes API (หรือใช้ผ่าน kubectl) เพื่อเช็ค infrastructure ได้เหมือนที่เราจัดการ pods เลย
➜ kubectl get buckets
NAME READY SYNCED EXTERNAL-NAME AGE
nopnithi-bucket-bm6r7 True True nopnithi-bucket-bm6r7 31s
โดยสิ่งที่เราสร้างขึ้นมาเรียกว่า managed resource (MR) ครับ และถ้าเราลองไปที่ AWS ก็จะเห็น bucket ถูกสร้างขึ้นมาด้วยชื่อเหมือน EXTERNAL-NAME นี่เลย และอีกจุดที่ดีกว่า Terraform ก็คือถ้ามีใครไปแอบเปลี่ยนอะไรที่ bucket นี้ Crossplane ที่คอยเช็คอยู่ก็จะช่วยเปลี่ยนกลับมาเหมือนเดิม
ก่อนไปต่อแวะสรุปหัวข้อ 1 และ 2 ก่อนนะ
- Crossplane คือ IaC tool ที่ทำให้เราสร้าง infrastructure resources ด้วย Kubernetes ได้
- Kubernetes จะดูแลมันให้เราเหมือนที่ดูแล application
- Cloud resource หนึ่งตัว (เช่น S3 bucket) ที่เราสร้างขึ้นมาด้วย Crossplane เรียกว่า managed resource (MR)
- Managed resource หนึ่งตัวก็คือ custom resource definition (CRD) และ custom controller ที่จะทำให้ Kubernetes สร้างและดูแล cloud resource ตัวนั้นได้
- เราไม่ต้องเขียน CRD หรือ custom controller เอง เพราะ Crossplane ทำให้หมดแล้ว
3) Composite Resources (XRs)#
เราสามารถสร้าง cloud resource ขึ้นมาผ่าน managed resource (MR) โดยตรงได้ แต่ตาม practice แล้วเราจะไม่ทำแบบนั้นเพราะมันยุ่งยาก นอกจากผู้สร้างจะต้องเข้าใจ infrastructure แล้ว ก็ต้องเข้าใจ Crossplane ด้วย
ดังนั้นเราจะรวม managed resources (MRs) หลายตัวเป็น resource ตัวใหม่และตั้งชื่อให้มันใหม่ จากนั้นสร้าง cloud resources ผ่าน resource นั้น โดยเราเรียก resource นี้ว่า Composite Resource (XR)
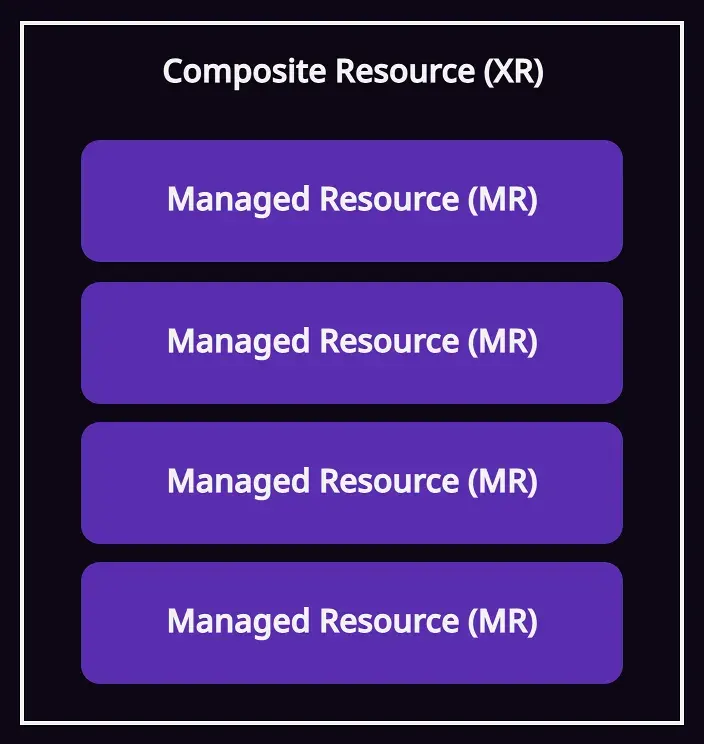
โดย composite resource (XR) คือ custom resource ที่เราสร้างขึ้นเพื่อ managed resources (MRs) ตั้งแต่ 1 ตัวขึ้นไปเข้าด้วยกัน และสร้าง API ใหม่ที่ง่ายกว่าในการสร้าง infrastructure ขึ้นมาให้ user ใช้แทน
ซึ่ง composite resource (XR) จะเป็นอะไรก็ได้ขึ้นอยู่กับเรากำหนด เช่น ผมจะตั้งชื่อว่า SimpleNetwork ที่ประกอบด้วย managed resource (MR) หลายตัวรวมกันตามรูปแบบนี้
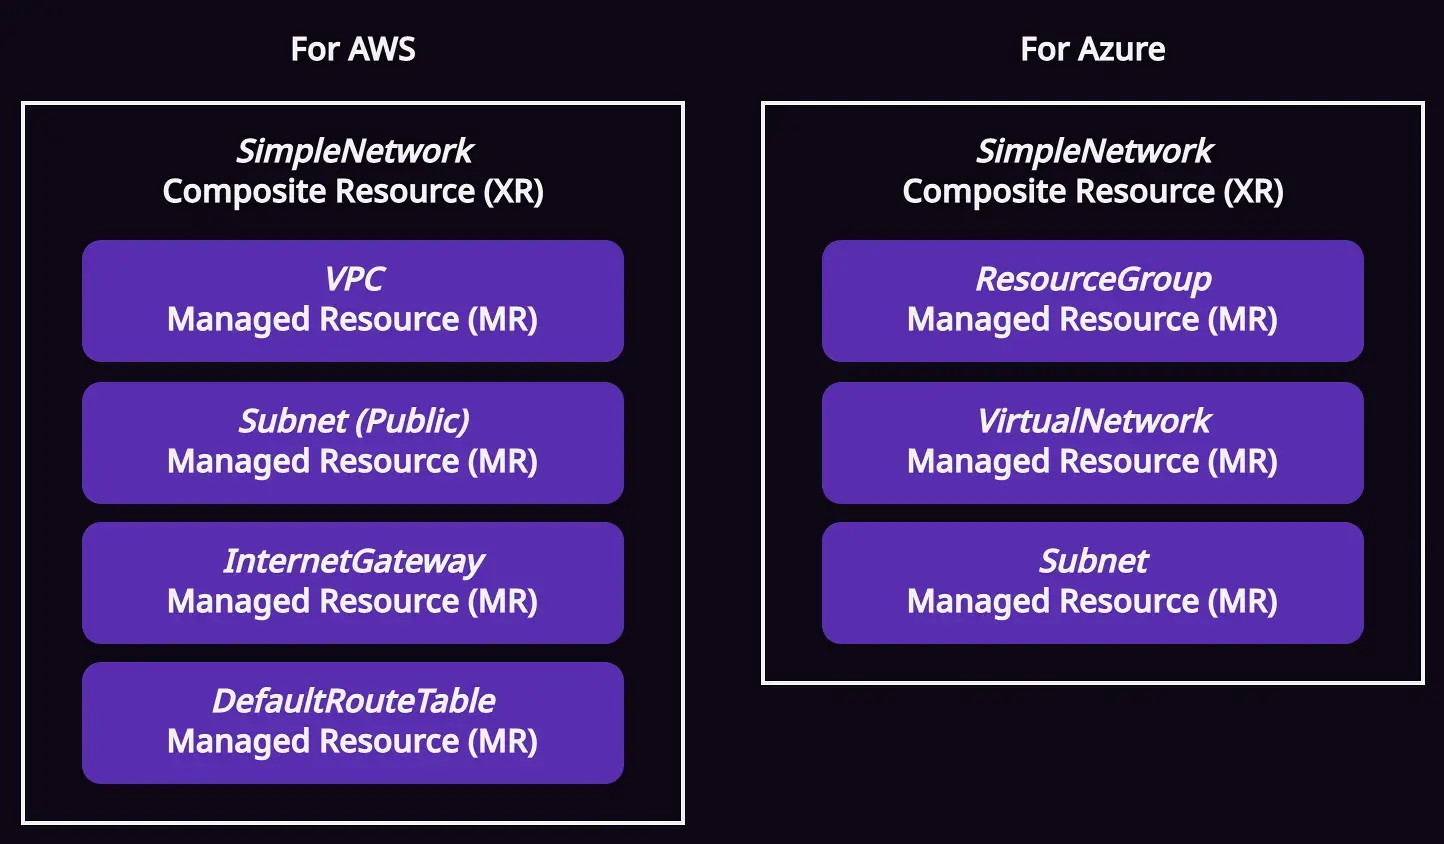
เวลาที่ user ต้องการ network เค้าก็แค่สร้าง SimpleNetwork ขึ้นมาโดยไม่ต้องมีความรู้ความเข้าใจใน underlying infrastructure ข้างล่าง แค่รู้ว่าต้องการ network ชื่ออะไร, อยู่ที่ไหน และมีขนาดเท่าไรก็พอ (ขึ้นอยู่กับเรากำหนด)
โดยการจะสร้าง composite resources (XRs) ขึ้นมา เราต้องกำหนดแบบ (blueprint) ให้มันก่อน ซึ่งต้องใช้ Composite Resources Definitions (XRDs) และ Compositions ครับ

3.1 Composite Resources Definitions (XRDs)#
Composite Resource Definition (XRD) คือส่วนที่ใช้กำหนด type ของ composite resource (XR) และกำหนด API schema ว่าเวลาที่เราจะสร้าง composite resource (XR) ขึ้นมาจะต้องใช้ API แบบไหน (มี property อะไรบ้าง)
หากเทียบกับ Terraform ก็ให้มอง XRD เหมือนกับ variable blocks ที่กำหนดไว้ใน
variables.tfของ Terraform module
สมมุติว่า composite resource (XR) ที่ชื่อ SimpleNetwork ของผมต้องการให้ user กำหนดมาแค่ 4 อย่างนี้ตอนสร้าง
nameคือ ชื่อของ networksizeคือ ขนาดของ networksmall(/24)medium(/20)large(/16)
locationคือ สถานที่ของ network (region บน AWS และ location บน Azure)sg(Singapore)us(USA)
providerคือ cloud platform ที่จะสร้าง networkawsazure
ดังนั้นผมก็ต้องไปกำหนดมันผ่านการสร้าง composite resources definition (XRD) ก่อน
ตัวอย่าง Composite Resources Definition (XRD) Manifest ชื่อ SimpleNetwork
---
apiVersion: apiextensions.crossplane.io/v1
kind: CompositeResourceDefinition
metadata:
name: simplenetworks.nopnithi.com
spec:
group: nopnithi.com
names:
kind: SimpleNetwork
plural: simplenetworks
claimNames:
kind: SimpleNetworkClaim
plural: simplenetworkclaims
versions:
- name: v1alpha1
served: true
referenceable: true
schema:
openAPIV3Schema:
type: object
properties:
spec:
type: object
properties:
name:
type: string
description: "The name of the network."
size:
type: string
description: "The size of the network."
enum:
- small
- medium
- large
location:
type: string
description: "The location of the network."
enum:
- sg
- us
required:
- name
- size
- location
บทความนี้ผมขอไม่อธิบายรายละเอียดครับ อยากเน้น concept ก่อน (เดี๋ยวจะตึงเกิน 😂) ส่วน lab เดี๋ยวจะตามมาทีหลัง
3.2) Compositions#
หลังจากที่เราได้ composite resource definition (XRD) แล้ว อีกส่วนคือ composition ครับ
Composition คือ template ที่ใช้สำหรับสร้าง composite resource (XR) ขึ้นมา โดยภายใน composition จะเป็นการกำหนดว่ามี managed resource (MR) อะไรบ้างภายใน composite resource (XR) ตัวนั้น
และถ้าผมต้องการให้ user สามารถสร้าง SimpleNetwork ได้ทั้งบน AWS และ Azure ผมก็ต้องสร้าง composition 2 ตัวแบบนี้…
ตัวอย่าง 1: Composition Manifest ของ SimpleNetwork สำหรับ AWS
---
apiVersion: apiextensions.crossplane.io/v1
kind: Composition
metadata:
name: aws-simplenetwork
labels:
provider: aws
spec:
# Defines which custom APIs (XRDs) for this template (composition) to create resources.
compositeTypeRef:
apiVersion: nopnithi.com/v1alpha1
kind: SimpleNetwork
patchSets:
- name: provider
patches:
- fromFieldPath: spec.compositionSelector.matchLabels.provider
toFieldPath: spec.providerConfigRef.name
transforms:
- type: string
string:
type: Format
fmt: "%s-default"
- name: region
patches:
- fromFieldPath: spec.location
toFieldPath: spec.forProvider.region
transforms:
- type: map
map:
sg: ap-southeast-1
us: us-east-1
- name: tags
patches:
- fromFieldPath: spec.name
toFieldPath: spec.forProvider.tags.Name
# Defines the managed resources (MRs) that this template (composition) creates.
resources:
- name: vpc
base:
apiVersion: ec2.aws.upbound.io/v1beta1
kind: VPC
spec:
forProvider:
enableDnsSupport: true
enableDnsHostnames: true
tags:
Name: simplenetwork-vpc
patches:
- type: PatchSet
patchSetName: provider
- type: PatchSet
patchSetName: region
- type: PatchSet
patchSetName: tags
- fromFieldPath: spec.size
toFieldPath: spec.forProvider.cidrBlock
transforms:
- type: map
map:
small: 10.0.0.0/24
medium: 10.0.0.0/20
large: 10.0.0.0/16
- name: public-subnet
base:
apiVersion: ec2.aws.upbound.io/v1beta1
kind: Subnet
metadata:
labels:
networkType: public
spec:
forProvider:
vpcIdSelector:
matchControllerRef: true
tags:
Name: simplenetwork-public-subnet
patches:
- type: PatchSet
patchSetName: provider
- type: PatchSet
patchSetName: region
- type: PatchSet
patchSetName: tags
- fromFieldPath: spec.size
toFieldPath: spec.forProvider.cidrBlock
transforms:
- type: map
map:
small: 10.0.0.0/26
medium: 10.0.0.0/22
large: 10.0.0.0/18
- fromFieldPath: spec.location
toFieldPath: spec.forProvider.availabilityZone
transforms:
- type: map
map:
sg: ap-southeast-1
us: us-east-1
- type: string
string:
type: Format
fmt: "%sa"
- name: internet-gateway
base:
apiVersion: ec2.aws.upbound.io/v1beta1
kind: InternetGateway
spec:
forProvider:
vpcIdSelector:
matchControllerRef: true
tags:
Name: simplenetwork-internet-gateway
patches:
- type: PatchSet
patchSetName: provider
- type: PatchSet
patchSetName: region
- type: PatchSet
patchSetName: tags
- name: default-route-table
base:
apiVersion: ec2.aws.upbound.io/v1beta1
kind: DefaultRouteTable
spec:
forProvider:
defaultRouteTableIdSelector:
matchControllerRef: true
route:
- cidrBlock: 0.0.0.0/0
gatewayIdSelector:
matchControllerRef: true
tags:
Name: simplenetwork-default-route-table
patches:
- type: PatchSet
patchSetName: provider
- type: PatchSet
patchSetName: region
- type: PatchSet
patchSetName: tags
ตัวอย่าง 2: Composition Manifest ของ SimpleNetwork สำหรับ Azure
---
apiVersion: apiextensions.crossplane.io/v1
kind: Composition
metadata:
name: azure-simplenetwork
labels:
provider: azure
spec:
# Defines which custom APIs (XRDs) for this template (composition) to create resources.
compositeTypeRef:
apiVersion: nopnithi.com/v1alpha1
kind: SimpleNetwork
patchSets:
- name: provider
patches:
- fromFieldPath: spec.compositionSelector.matchLabels.provider
toFieldPath: spec.providerConfigRef.name
transforms:
- type: string
string:
type: Format
fmt: "%s-default"
- name: location
patches:
- fromFieldPath: spec.location
toFieldPath: spec.forProvider.location
transforms:
- type: map
map:
sg: "Southeast Asia"
us: "West US"
- name: tags
patches:
- fromFieldPath: spec.name
toFieldPath: spec.forProvider.tags.Name
# Defines the managed resources (MRs) that this template (composition) creates.
resources:
- name: resource-group
base:
apiVersion: azure.upbound.io/v1beta1
kind: ResourceGroup
patches:
- type: PatchSet
patchSetName: provider
- type: PatchSet
patchSetName: location
- type: PatchSet
patchSetName: tags
- name: vnet
base:
apiVersion: network.azure.upbound.io/v1beta1
kind: VirtualNetwork
spec:
forProvider:
resourceGroupNameSelector:
matchControllerRef: true
patches:
- type: PatchSet
patchSetName: provider
- type: PatchSet
patchSetName: location
- type: PatchSet
patchSetName: tags
- fromFieldPath: spec.size
toFieldPath: spec.forProvider.addressSpace
transforms:
- type: map
map:
small: ["10.0.0.0/24"]
medium: ["10.0.0.0/20"]
large: ["10.0.0.0/16"]
- name: subnet
base:
apiVersion: network.azure.upbound.io/v1beta1
kind: Subnet
spec:
forProvider:
resourceGroupNameSelector:
matchControllerRef: true
virtualNetworkNameSelector:
matchControllerRef: true
patches:
- type: PatchSet
patchSetName: provider
- fromFieldPath: spec.size
toFieldPath: spec.forProvider.addressPrefixes
transforms:
- type: map
map:
small: ["10.0.0.0/26"]
medium: ["10.0.0.0/22"]
large: ["10.0.0.0/18"]
อย่าพึ่งตกใจครับ ยังไม่ต้องลงรายละเอียดทุกบรรทัด ที่ผมเอา composition manifests มาให้ดูก็เพื่อให้เห็นภาพว่า composition ใช้เพื่อกำหนดว่า composite resource (XR) ของเรานั้นมี managed resources (MRs) อะไรบ้าง (ดูคร่าว ๆ ก็น่าจะเดาได้ใช่มั้ยครับ?)
สังเกตว่าของ AWS และ Azure จะมีรายละเอียดที่ต่างกัน เช่น
- กำหนด managed resources (MRs) ใน
resourcesไม่เหมือนกัน (แน่หละ…คนละ platform) - การ map API ไปสร้าง managed resources (MRs) ด้วย
patchesก็(ต้อง)ไม่เหมือนกัน - ใช้ provider (
metadata.labels.provider) คนละตัวกัน
แต่ที่เหมือนกันคือทั้งสอง compositions ใช้ composite resource definition (XRD) เดียวกัน (kind: SimpleNetwork) เหตุผลก็เพราะเราต้องการให้ developer สร้าง network บน cloud ใด ๆ ด้วยวิธีการ (API) เดียวกันนั่นเอง
หลังจากนี้ถ้าใครต้องการจะสร้าง network ก็สามารถสร้างมันขึ้นมาได้เลยง่าย ๆ แบบไม่ต้องรู้อะไร ซึ่ง standard หรือ policies ทั้งหมดถูกกำหนดโดย platform engineer เรียบร้อยแล้ว
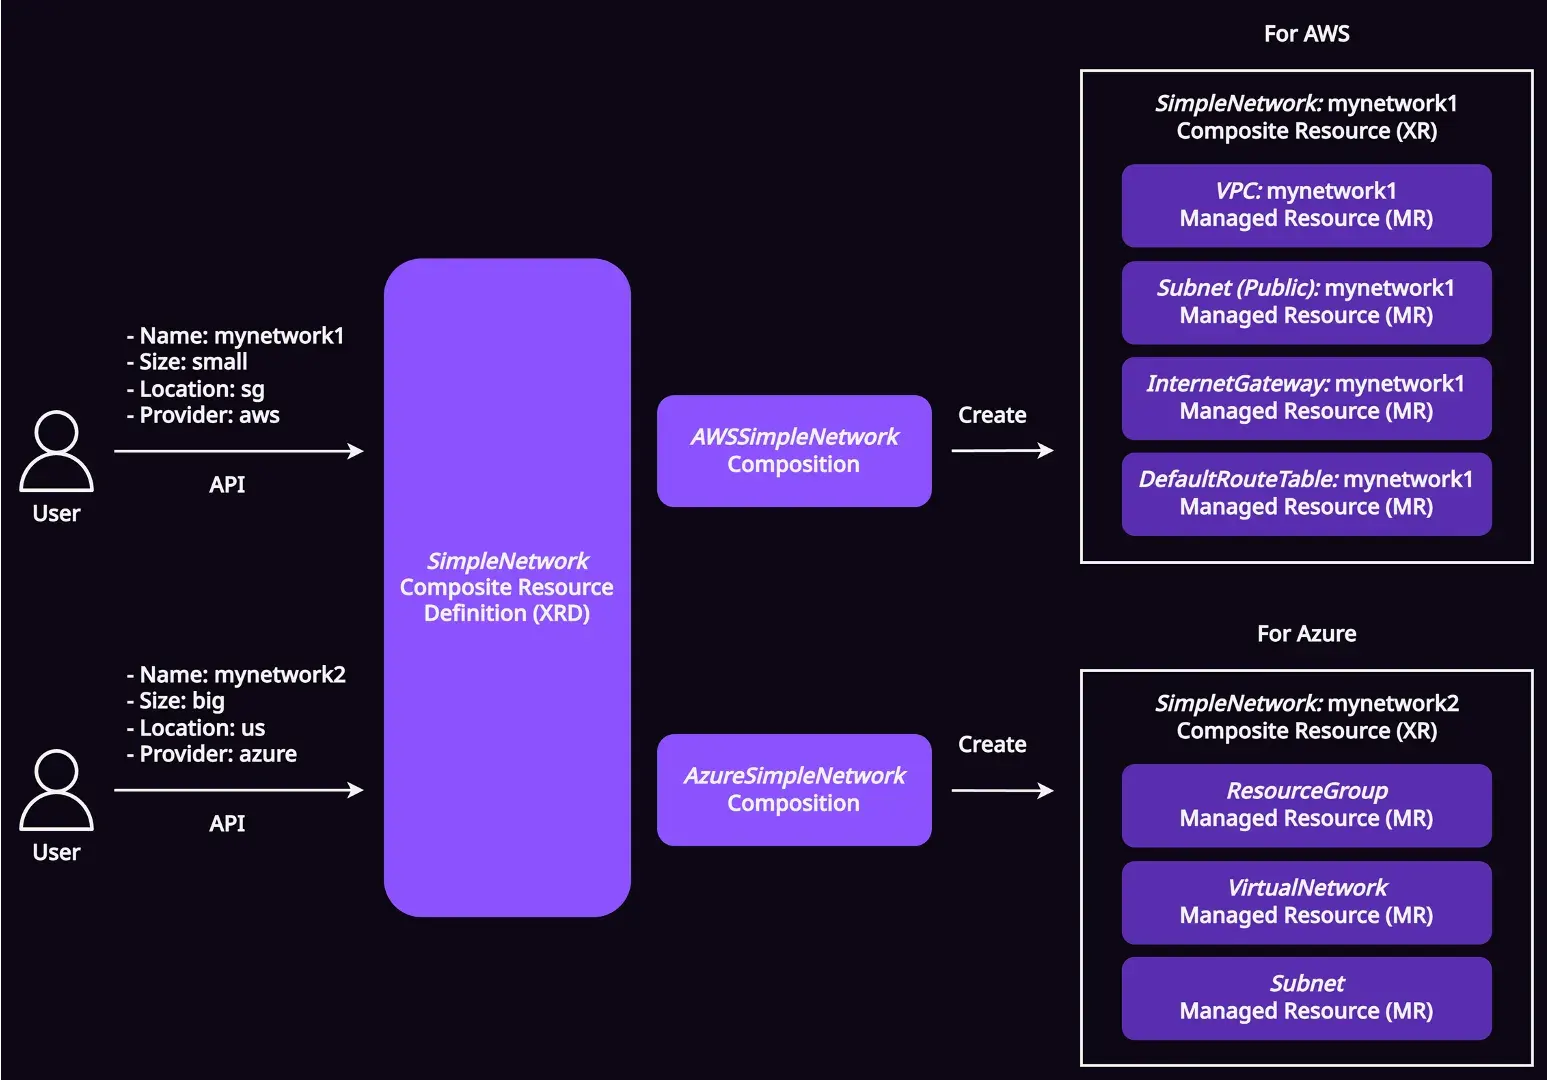
ตัวอย่าง Composite Resources (XRs) Manifest สำหรับสร้าง SimpleNetwork บน AWS และ Azure
---
apiVersion: nopnithi.com/v1alpha1
kind: SimpleNetwork
metadata:
name: simplenetwork1
spec:
compositionSelector:
matchLabels:
provider: aws
name: simplenetwork1
size: small
location: sg
---
apiVersion: nopnithi.com/v1alpha1
kind: SimpleNetwork
metadata:
name: simplenetwork2
spec:
compositionSelector:
matchLabels:
provider: azure
name: simplenetwork2
size: large
location: us
เหมือนจะจบ…แต่ยังมีปัญหาอีกเล็กน้อยตรงที่ composite resource (XR) ที่สร้างขึ้นมันเป็น cluster-scoped คือไม่ได้อยู่ใน namespace ซึ่งบริษัทเราอาจจะมี developer หลายทีม ถ้า resource ของทุกทีมมากองรวมกันที่เดียวก็คงจัดการได้ยากใช่มั้ยครับ?
ก่อนไปต่อแวะสรุปหัวข้อ 3 ก่อนนะ
- ปกติเราไม่สร้าง cloud resource กันทีละตัวด้วย managed resource (MR) หรอก เพราะมันซับซ้อนวุ่นวาย
- ยกตัวอย่างเช่น การจะสร้าง object storage ตัวหนึ่งขึ้นมา เพื่อให้ปลอดภัยอาจจะมีเรื่องให้ทำหลายส่วน เช่น
- ต้องเปิด versioning ด้วยมั้ย? หรือเปิดเฉพาะ production?
- ต้องทำ encryption ด้วย customer-managed key?
- แล้วจะเก็บ key ที่ไหน?, ตั้งชื่อว่าอะไร?, ต้อง rorate key ด้วยมั้ย?
- Data ที่อัพโหลดเข้ามาต้องใช้ storage tier ไหนถึงจะเหมาะสม?
- ต้องทำ lifecycle policy ยังไง? เก็บ data ไว้กี่วัน? ถึงเวลาต้องย้ายไป storage tier ไหนให้ประหยัด?
- การให้ developer มาเข้าใจทั้งหมดนั้นแทบเป็นไปไม่ได้ ดังนั้นเราจึงต้องมีทีม platform ช่วยกันทำให้มันง่ายขึ้น
- ในการใช้ Crossplane, ทีม platform จะสร้าง…
- Composite Resource Definition (XRD) เพื่อสร้าง API และกำหนด fields ที่ developer จะต้องส่งเข้ามา
- Composition เพื่อกำหนดว่า resources ที่ต้องสร้างจริง ๆ มีอะไรบ้าง? และต้อง configure แบบไหน
- นั่นแปลว่าเวลา developer สร้าง object storage ก็ใส่ parameters มาแบบง่าย ๆ เลย เช่น
- ชื่อ resource อะไร?, ใช้เก็บ data ประเภทไหน?, environment ไหน? จบเลย
- ส่วนอื่น ๆ ระบบจะจัดการให้ทั้งหมดเพื่อให้เป็นไปตาม standard ของบริษัท
4) Composite Resource Claims (XRCs) หรือ Claims#
Claims หรือชื่อเต็มคือ Composite Resource Claim s ( XRCs) ถ้าให้แปลเป็นภาษาไทยก็คงจะเป็น “อ้างสิทธิ์” หละมั้ง ซึ่ง claim ถือเป็น interface ตัวจริงตาม practice ที่ user ใช้สำหรับสร้าง composite resources (XRs) ขึ้นมา
แม้ว่าการสร้าง composite resources (XRs) โดยตรง กับ การสร้าง claim นั้นจะให้ผลลัพธ์ที่เหมือนกัน แต่ความต่างก็คือ
- Claims เป็น namespace-scoped
- Composite resources (XRs) เป็น cluster-scoped

ดังนั้นการสร้างผ่าน claims จะช่วยให้เราสามารถแยกได้ว่า resources บน Kubernetes cluster นั้นเป็นของใคร (ทีมไหน) โดยยึดตาม namespace สำหรับแต่ละทีม (เหมือนกับที่เราใช้จัดการ application นั่นแหละ)
โดยถ้าย้อนกลับไปดูที่ composite resources definition (XRD) ผมได้กำหนด claim เอาไว้แล้วที่ claimNames
---
apiVersion: apiextensions.crossplane.io/v1
kind: CompositeResourceDefinition
metadata:
name: simplenetworks.nopnithi.com
spec:
group: nopnithi.com
names:
kind: SimpleNetwork
plural: simplenetworks
claimNames:
kind: SimpleNetworkClaim
plural: simplenetworkclaims
...
...
ดังนั้น user สามารถเปลี่ยนมาสร้าง SimpleNetwork ผ่าน claim ได้ไม่ยากด้วยการเปลี่ยนจาก kind: SimpleNetwork เป็น kind: SimpleNetworkClaim ตามที่กำหนดไว้ใน composite resource definition (XRD) นอกนั้นเหมือนเดิมทุกประการ
ตัวอย่าง Manifest ในการสร้าง Composite Resource (XR) โดยตรง
---
apiVersion: nopnithi.com/v1alpha1
kind: SimpleNetworkClaim
metadata:
name: simplenetwork1
namespace: team-a
spec:
compositionSelector:
matchLabels:
provider: aws
name: simplenetwork1
size: small
location: sg
ตัวอย่าง Manifest ในการสร้าง Composite Resource (XR) ผ่าน Claim
---
apiVersion: nopnithi.com/v1alpha1
kind: SimpleNetworkClaim
metadata:
name: simplenetwork2
namespace: team-b
spec:
compositionSelector:
matchLabels:
provider: azure
name: simplenetwork2
size: large
location: us
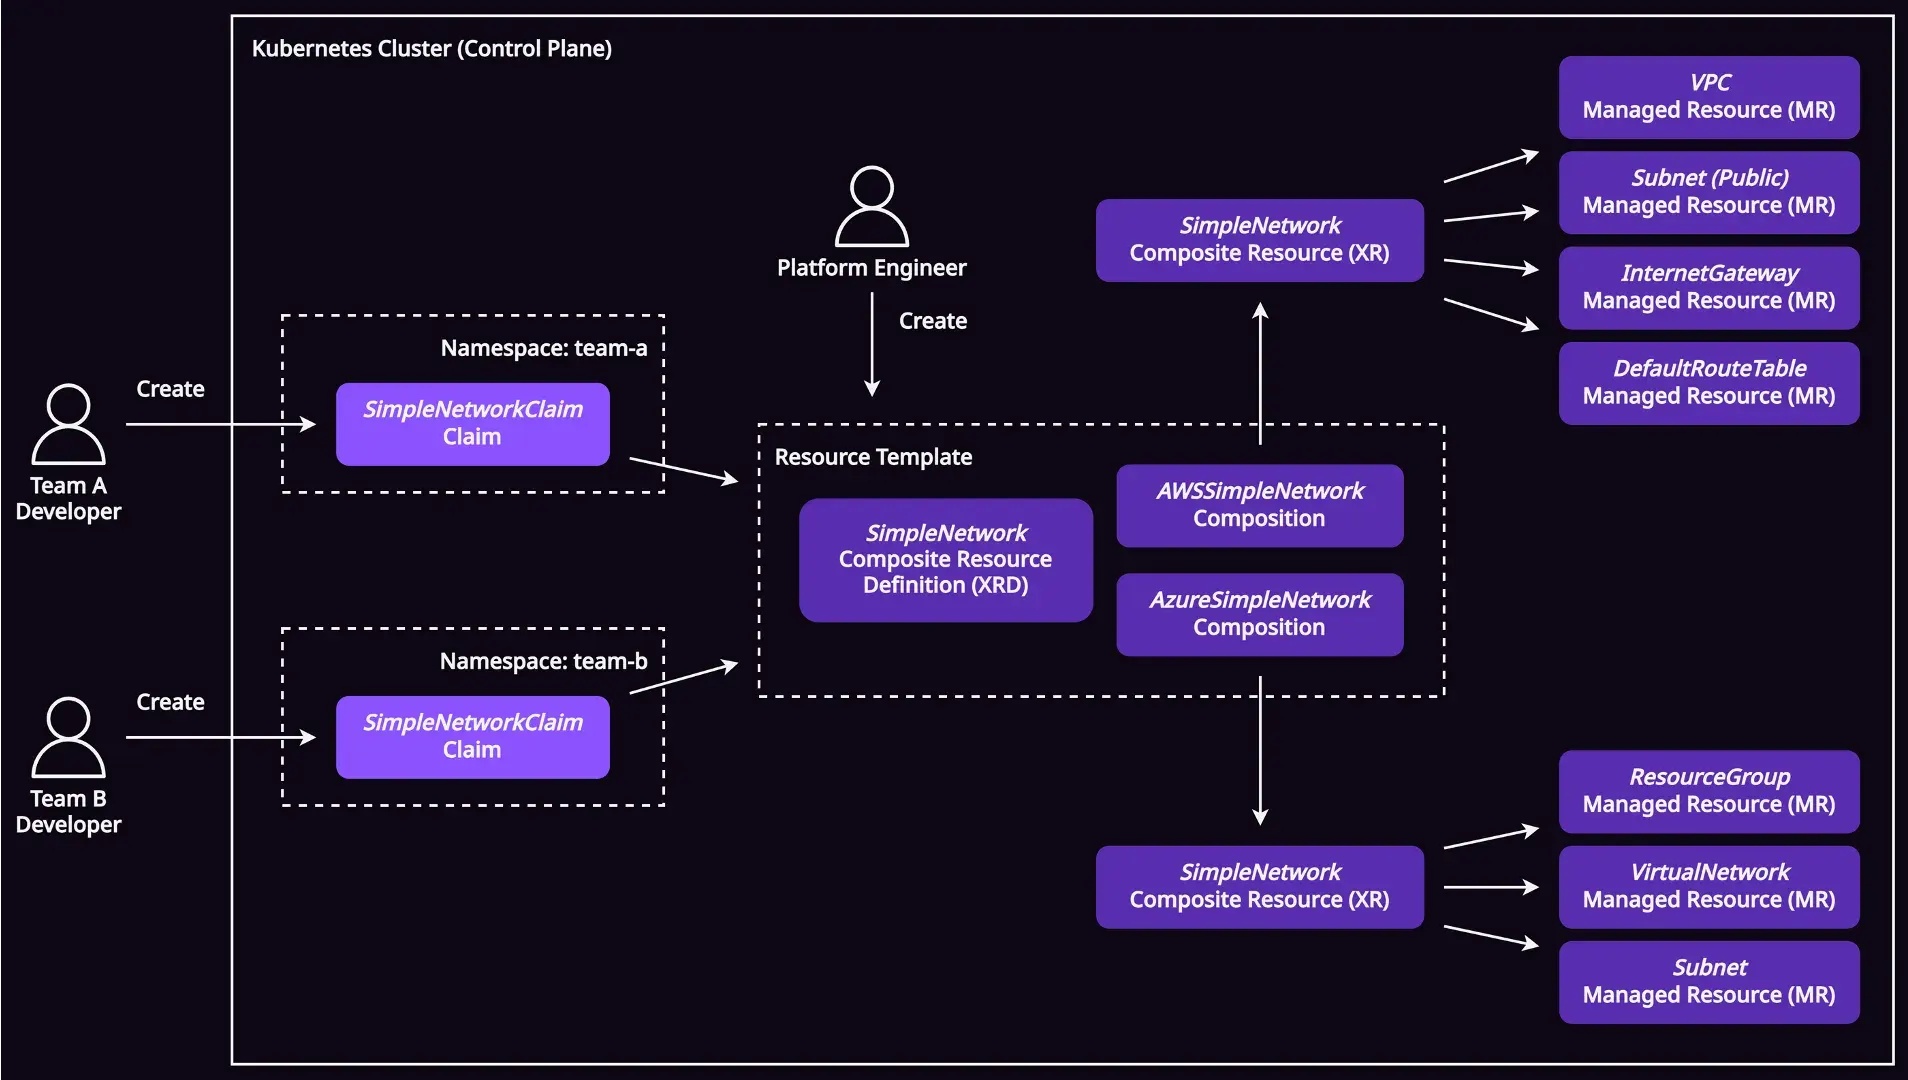
โดยเมื่อเราสร้าง claim เราก็จะได้ composite resource (XR) เหมือนเดิมครับ และทุกอย่างจะยังคงอยู่ใน cluster-scoped เช่นกัน เพียงแต่จะมี claim resource ที่อยู่ใน namespace เพิ่มขึ้นมา ช่วยให้เราแยกแยะ resources ของแต่ละทีมได้ง่ายขึ้น
อันนี้คือ claims ที่ผมสร้างขึ้นใน namespace team-a และ team-b
➜ kubectl get simplenetworkclaims.nopnithi.com --all-namespaces
NAMESPACE NAME SYNCED READY CONNECTION-SECRET AGE
team-a simplenetwork1 True True 3m38s
team-b simplenetwork2 True True 2m56s
และแต่ละ claim ก็จะสร้าง composite resource (XR) ของตัวเองอยู่ใน cluster-scoped เหมือนกัน
➜ kubectl get simplenetworks.nopnithi.com
NAME SYNCED READY COMPOSITION AGE
simplenetwork1-92xd9 True True aws-simplenetwork 3m48s
simplenetwork2-rzn7s True True azure-simplenetwork 3m6s
ก่อนไปต่อแวะสรุปหัวข้อ 4 - Claims ก่อนนะ
- ทุกอย่างที่คุยกันมาล้วนเป็น cluster-scoped resources ทั้งหมด การจะแยกแยะว่า resources ไหนเป็นของใครก็ทำได้ยาก
- ดังนั้นแทนที่ developer จะสร้าง cloud resources ผ่าน composite resources (XRs) ก็จะสร้างผ่าน claims แทน
- เมื่อสร้าง claim มันก็จะไปสร้าง composite resource (XR)
- จาก composite resource (XR) ก็จะไปสร้าง managed resources (MRs) ต่อ
- โดย claim จะอยู่ใน namespace ส่วนที่เหลือเป็น cluster-scoped ทั้งหมด
สุดท้ายรูปนี้คือ architecture ทั้งหมดของ Crossplane concept พื้นฐานที่เราเรียนรู้กันมาทีละส่วน ค่อย ๆ ทำความเข้าใจดูนะครับ
บทสรุป (Conclusion)#
ส่วนตัวผมมองว่า Crossplane เป็น tool ที่ทรงพลังและมี potential ที่ดีโดยเฉพาะช่วงนี้ที่ platform engineering กำลังมา มันช่วยให้เราสามารถสร้าง infrastructure platform หรือ control plane ขึ้นมาได้โดยใช้ความสามารถของ Kubernetes เข้ามาช่วยจัดการกับ infrastructure เช่น การสร้าง infrastructure APIs, การทำ reconcile, ใช้ RBAC เพื่อกำหนด permissions ในระดับ API, หรือการเขียน Kubernetes operators เข้ามาช่วยจัดการ
และเรายังสามารถใช้ tools, solutions หรือ practices แบบเดียวกับฝั่ง application ได้ เช่น การ deploy ผ่าน kubectl หรือ GitOps อย่าง Argo CD หรือ Flux, เรื่อง observability stack ต่าง ๆ ซึ่งพวกนี้จะช่วยยกระดับความสามารถในการ scale, automate และ self-service ในฝั่ง infrastructure ให้ดียิ่งขึ้น
ถึงแม้การเรียนรู้ Crossplane อาจใช้เวลาบ้างในช่วงแรกเมื่อเทียบกับ IaC tools ตัวอื่น แต่เมื่อเราเข้าใจและจัดการมันอย่างเป็นระบบแล้ว Crossplane จะช่วยให้การสร้าง platform เป็นเรื่องง่ายขึ้นครับ เดี๋ยวบทความหน้าเราจะมาลองทำ Crossplane lab ไปด้วยกัน