Table of Contents
- บทนำ (Introduction)
- Git Hooks คืออะไร? มีกี่แบบ?
- ทำความรู้จักกับ Git
pre-commitHook - Use Cases การนำ Git
pre-commitHook มาใช้ - วิธีการ Configure และใช้งาน Git
pre-commitHook - ตัวอย่าง 1: การใช้งาน Git
pre-commitHook - ข้อจำกัดของ
pre-commitHook แบบปกติ - แนะนำ Frameworks ที่ช่วยจัดการ Git Hooks ให้ง่ายขึ้น
- ตัวอย่าง 2: ใช้ pre-commit (Framework) ช่วยจัดการ
pre-commitHook - บทสรุป (Conclusion)
บทนำ (Introduction)
กระบวนการพัฒนา software ทุกวันนี้มี tasks ซ้ำ ๆ ที่มีความซับซ้อนและกินเวลามากอยู่แทบทุกส่วน เหตุผลก็เพื่อให้ได้มาซึ่ง application ที่มีคุณภาพและปลอดภัย เช่น การตรวจสอบต่าง ๆ ภายใน code ซึ่งการที่เราจะต้องทำสิ่งเหล่านั้นด้วยตัวเองทั้งหมดก็เป็นอะไรที่ค่อนข้างท้าทาย
แต่เราสามารถใช้ประโยชน์จากความสามารถของ Git อย่าง “Git Hooks” เพื่อช่วยทำงานบางอย่างได้ โดยเฉพาะอย่างยิ่ง pre-commit hook ซึ่งเป็นการทำ automation ตั้งแต่ก่อน commit ซึ่งเป็นจุดที่เหมาะสมสำหรับการใช้ script เพื่อตรวจสอบหรือ transform code ก่อนจะมีการ commit code เข้าไปใน Git repository (กันไว้ย่อมดีกว่าแก้)
Git Hooks คืออะไร? มีกี่แบบ?
Git hooks คือ script ที่จะรันโดยอัตโนมัติเมื่อมี event บางอย่างเกิดขึ้นใน Git เช่น การ commit, merge หรือ push โดยหลัก ๆ จะแบ่งออกเป็น 2 แบบคือ
1. Client-side Hooks (ทำงานฝั่ง Git Local)
pre-commit: รันก่อน commitprepare-commit-msg: รันหลังสร้าง commit message แต่ก่อนจะเปิด editorcommit-msg: รันหลัง commit message ถูกสร้างเพื่อตรวจสอบ messagepost-commit: รันหลัง commit เสร็จสมบูรณ์pre-push: รันก่อน push ไปยัง remotepost-checkout: รันหลังจากมีการ checkout branch หรือ restore ไฟล์ใด ๆpre-rebase: รันก่อนมีการ rebase โดยสามารถใช้ป้องกันไม่ให้ทำ rebase กับ branch ที่ต้องการได้
2. Server-side Hooks (ทำงานฝั่ง Git Server)
pre-receive: รันเมื่อ server รับ push เพื่อตรวจสอบก่อนupdate: คล้าย pre-receive แต่รันต่อ branchpost-receive: รันหลังจาก push เสร็จสมบูรณ์ เพื่อ notification หรือ update service อื่น ๆ
ซึ่งไฟล์ hooks พวกนี้จะอยู่ที่ directory .git/hooks/ และมีตัวอย่างให้ดูอยู่ใน directory นั่นแหละครับ ลอง ls -l .git/hooks/ ดูได้เลย หากจะใช้ก็แค่ลบ .sample ออก
ทำความรู้จักกับ Git pre-commit Hook
pre-commit hook คือ script ที่จะถูกรันโดยอัตโนมัติก่อนการ commit (มาดักหลังจากที่เราใช้คำสั่ง git commit ไป) โดยเราสามารถเขียน script เพื่อตรวจสอบหรือปรับแต่ง code ก่อนที่จะถูก commit เข้าไปใน repository ได้ ซึ่งเป็นการป้องกันปัญหาตั้งแต่ต้นทาง
Use Cases การนำ Git pre-commit Hook มาใช้
วิเคราะห์ Static Code:
- ตรวจสอบ/ปรับ indentation, spacing, line breaks
- ตรวจหา bugs, potential errors, code smells
- ใช้ Prettier, ESLint สำหรับ Javascript หรือ Black, PyLint สำหรับ Python
- ฝั่ง infrastructure เช่น Ansible Lint หรือของ Terraform อย่างคำสั่ง
terraform fmtและterraform validate
Automated Tests:
- รัน unit tests หรือ integration tests
- ตรวจสอบว่า changes ใหม่ไม่ทำให้เกิดปัญหากับฟังก์ชันที่มีอยู่
- แจ้งเตือน developer กรณีเจอ tests ไม่ผ่าน
Security และ Audit:
- รัน tools เพื่อตรวจสอบความปลอดภัยของ application หรือ infrastructure code
- ตรวจสอบ vulnerabilities หรือ insecure configurations
- ใช้ tools เช่น Checkov, Talisman หรือ Snyk
Sensitive Information:
- ตรวจหา passwords, keys, tokens หรือ API keys
- ป้องกันไม่ให้ commit ข้อมูล sensitive ขึ้น Git repository
- ใช้ tools เช่น gitleaks หรือ TruffleHog
Dependencies:
- ตรวจสอบการอัพเดท dependencies ต่าง ๆ
- เตือนกรณีที่มี dependencies version เก่าหรือมีความเสี่ยงด้านความปลอดภัย
- ใช้ tools เช่น SafetyCLI ใน Python หรือ
npm audit,yarn auditของ Node.js
Version Pinning:
- ตรวจสอบว่า version ของ tools และ dependencies ให้เป็นแบบ specific version
- ป้องกันปัญหาเรื่อง compatibility จากการอัพเดทของ dependencies ใน version ใหม่ ๆ
- เช่น การใช้ package-lock.json ใน Node.js หรือ Gemfile.lock ใน Ruby
Document และ Alert/Notification:
- สร้างหรืออัพเดท document อัตโนมัติ เช่น API documentation, README.md หรือ changelogs
- ส่ง notification ไปยัง chat หรือ email หากมีการ commit ที่สำคัญ
- ใช้ tools เช่น mkdocs หรือ Sphinx
วิธีการ Configure และใช้งาน Git pre-commit Hook
- สร้างไฟล์ script ชื่อว่า
pre-commitใน.git/hooks/directory - เขียน script ตามที่ต้องการ เช่น Bash หรือ Python
- เซ็ต permission ให้ script สามารถรันได้ด้วย
chmod +x .git/hooks/pre-commit - ทุกครั้งที่เรารัน
git commitscript จะทำงานอัตโนมัติก่อน commit จริง
ซึ่งถ้า…
- script รันสำเร็จ (exit code เท่ากับ 0) ก็จะ commit
- script รันไม่สำเร็จ (exit code ไม่เท่ากับ 0) ก็จะยกเลิก commit นั้นไป
ตัวอย่าง 1: การใช้งาน Git pre-commit Hook
ผมใช้ pre-commit hook นี้เพื่อช่วยในการเขียนบทความครับ โดยปกติแล้วผมจะเขียนบทความอยู่ในไฟล์ Markdown (*.md) และผมต้องการให้มันช่วยใส่ pubDatetime และ modDatetime ใน frontmatter ให้อัตโนมัติ โดยมีเงื่อนไขคือ…
- ถ้าผมสร้างไฟล์ใหม่เพื่อเขียนบทความ มันจะใส่
pubDatetimeให้ตามวันเวลาปัจจุบัน - ถ้าผมแก้ไขบทความและ commit ไป มันจะใส่
modDatetimeให้ตามวันเวลาปัจจุบัน - และทั้งสองกรณีจะต้องเป็น
draft: falseเท่านั้น เพราะถ้าเป็น draft ผมจะไม่บันทึกวันเวลา
รูปด้านล่างนี้เปรียบเทียบ flow ระหว่างการ “ใช้ และ ไม่ใช้” pre-commit hook
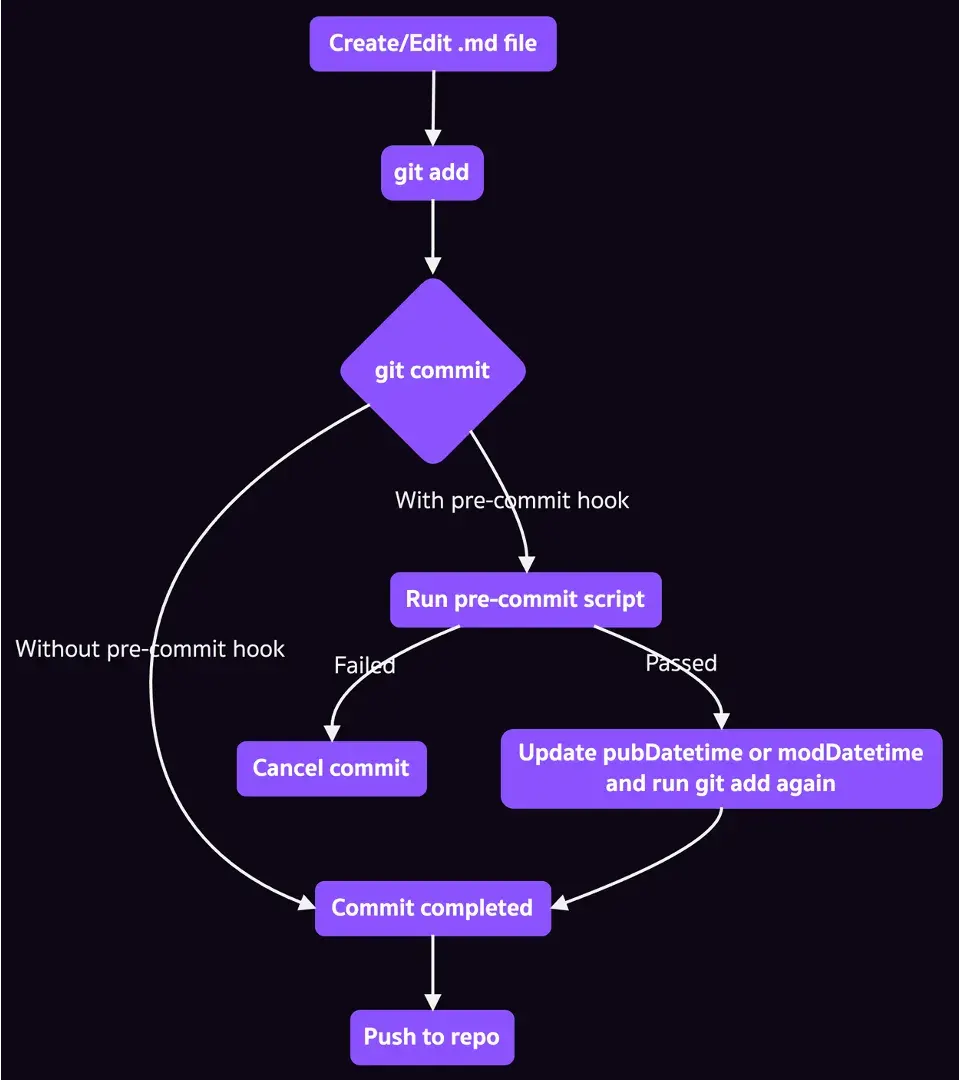
น่าจะพอเห็นภาพบ้างแล้ว งั้นไปดูวิธีการทำกันเลย (ลองทำตามได้นะครับ)
- หลังจากที่เรา
git initแล้ว ให้สร้างไฟล์pre-commitใน directory.git/hooks/และเขียน Bash script ตามนี้
#!/bin/bash

# Check if the file has the frontmatter
has_frontmatter() {
  local file_path="$1"
  local first_line=$(head -n 1 "$file_path")
  local second_line=$(head -n 2 "$file_path" | tail -n 1)
  if [[ $first_line != "---" || ! $second_line =~ author: ]]; then
    return 1
  fi
  return 0
}

# Get the current UTC and Bangkok time
get_current_time() {
  local utc_time=$(date -u "+%Y-%m-%dT%H:%M:%SZ")
  local bkk_time=$(TZ="Asia/Bangkok" date "+%d %b %Y %H:%M:%S")
  echo "$utc_time  # $bkk_time (Bangkok)"
}

# Function to update the datetime field in frontmatter
update_datetime() {
  local file="$1"
  local file_status="$2"
  local field="$3"
  local current_time="$4"

  # Split the file into frontmatter and content
  csplit "$file" '/^---$/2' > /dev/null

  # Update the frontmatter using appropriate sed command based on OS
  if [[ "$OSTYPE" == "darwin"* ]]; then
    sed -i '' "s/^$field:.*/$field: $current_time/" xx00
  else
    sed -i "s/^$field:.*/$field: $current_time/" xx00
  fi

  # Merge updated frontmatter and content
  cat xx00 xx01 > temp_updated_file
  # Update the original file
  mv temp_updated_file "$file"
  rm xx00 xx01
  echo "- Updated $field for $file ($file_status)"
}

main() {
  local changed_files="$1"
  # Check if there are any changed files to process
  if [ -n "$changed_files" ]; then
    while read -r file_status file1 file2; do
      # Determine the file path to process based on its status
      # For renames (R status), use the new file name
      local file_path=""
      if [[ "$file_status" == "R"* ]]; then
        file_path="$file2"
      else
        file_path="$file1"
      fi

      # Skip processing for deleted files, renames without changes,
      # files without frontmatter, or draft files
      if [[ "$file_status" == "D" || "$file_status" == "R100" ]] || \
         ! has_frontmatter "$file_path" || grep -q "^draft: true" "$file_path"; then
        echo "- Skipping file: $file_path"
        continue

      # Set the field name to be updated in the frontmatter
      # 'pubDatetime' for added files, 'modDatetime' for others
      local field_name=""
      elif [[ "$file_status" == "A" ]]; then
        field_name="pubDatetime"
      else
        field_name="modDatetime"
      fi

      # Get the current time in UTC and Bangkok timezone
      local current_time=$(get_current_time)
      # Update the datetime field in the file's frontmatter
      update_datetime "$file_path" "${file_status:0:1}" "$field_name" "$current_time"
      # Stage the updated file for commit
      git add "$file_path"
    done <<< "$changed_files"
    echo ""
    echo "--------------------------------------------------------------------"
  fi
}

# Get the status and paths of all changed markdown files
changed_files=$(git diff --cached --name-status \
  | grep -iE "(^[AMD]|^R[0-9]{3}).*\.md$" \
  | awk '{print $1, $2, $3}')
main "$changed_files"
- เซ็ต permission ของ script ให้เป็น executable (สามารถรันได้)
chmod +x .git/hooks/pre-commit
- กลับมาที่ working directory สร้างไฟล์บทความใหม่ชื่อ
myarticle1.mdและเขียนเนื้อหาลงไป
---
title: "My Article 1"
draft: false
pubDatetime:
modDatetime:
---

## Topic 1

Welcome to my new article
...
...
...
- เมื่อเขียนบทความเสร็จก็ save ไฟล์และรัน
git addจากนั้นก็git commit
git add myarticle1.md
git commit -m "add new article 1"
ปกติแล้วจะเป็นการ commit ไฟล์เข้า Git ทันที แต่เมื่อมี pre-commit script จังหวะที่เรา commit มันจะไป trigger ให้ Bash script ทำงาน โดยจะเห็น output ว่ามันมีการเพิ่ม pubDatetime ใน frontmatter ของไฟล์ myarticle1.md ก่อน จากนั้นจึงรัน git add อีกครั้งก่อนจะ commit
- Updated pubDatetime for myarticle1.md (A)
--------------------------------------------------------------------
[main a1b2c3d] add new article 1
 1 file changed, 24 insertions(+)
 create mode 100644 myarticle1.md
และเมื่อผมลองเปิดไฟล์ myarticle1.md ขึ้นมาดูก็จะเห็นว่า pubDatetime ถูกอัพเดทตามวันเวลาปัจจุบันแล้วเรียบร้อย
---
title: "My Article 1"
draft: false
pubDatetime: 2024-03-25T09:43:51Z  # 25 Mar 2024 16:43:51 (Bangkok)
modDatetime:
---

## Topic 1

Welcome to my new article
...
...
...
ต่อมาเมื่อผมมีเหตุให้ต้องแก้ไขบทความ ผมก็ไม่ต้องใส่ modDatetime เอง แค่แก้ไขไฟล์แล้ว git add และ git commit ไปตามปกติ เจ้า pre-commit script ก็จะอัพเดท modDatetime ให้อัตโนมัติแบบนี้
---
title: "My Article 1"
draft: false
pubDatetime: 2024-03-25T09:43:51Z  # 25 Mar 2024 16:43:51 (Bangkok)
modDatetime: 2024-03-26T11:48:36Z  # 26 Mar 2024 18:48:36 (Bangkok)
---

## Topic 1

Welcome to my updated article
...
...
...
ข้อจำกัดของ pre-commit Hook แบบปกติ
แม้ว่าเราจะสามารถเขียน pre-commit hook ขึ้นมาใช้เองได้ไม่ยากนัก แต่ก็มีข้อจำกัดบางประการ เช่น
- ต้องสร้างไฟล์
pre-commitใน.git/hooks/เอง - อัพเดทหรือเพิ่ม hook ใหม่ลำบาก ต้องแก้ในไฟล์ script เอง
- ติดตั้งและจัดการ tools หรือ dependencies ที่ใช้ใน hook เองทั้งหมด เช่น linter หรือ formatter
- แชร์ hook configuration ให้คนอื่นในทีมใช้ได้ยาก เพราะต้องนำ script ไปวางเอง
- ไม่สามารถใช้ hooks/scripts ที่มีคนเขียนไว้แล้วจาก community ได้
แนะนำ Frameworks ที่ช่วยจัดการ Git Hooks ให้ง่ายขึ้น
เพื่อแก้ปัญหาข้อจำกัดต่าง ๆ ของการใช้ Git hooks แบบตรง ๆ ที่เราทำกันไป จึงมี framework (ที่จริงมันเหมือน wrapper แหละครับ) ที่ถูกพัฒนาขึ้นมาเพื่อช่วยให้แก้ปัญหาข้างต้น เช่น
- pre-commit: ช่วยจัดการ configuration ของ Git hooks ได้ง่ายขึ้น (ไม่ใช่แค่
pre-commitตามชื่อ) - Husky: ช่วยจัดการ hooks สำหรับ Node.js project (JavaScript หรือ TypeScript) ผ่าน
package.json
ตัวอย่าง 2: ใช้ pre-commit (Framework) ช่วยจัดการ pre-commit Hook
ด้วยความยุ่งยากของการใช้ Git hooks โดยตรงแบบที่ผมได้อธิบายไป เดี๋ยว section นี้เราจะมาปรับ pre-commit hook ให้จัดการได้ง่ายขึ้นผ่าน framework ที่ชื่อว่า pre-commit กันครับ
- ติดตั้ง pre-commit (framework) ก่อน โดยเครื่องเราต้องมี Python ด้วยนะครับ
pip install pre-commit
- ย้ายไฟล์
.git/hooks/pre-commitไปไว้ที่ root ของ project แล้วเปลี่ยนชื่อเป็นupdate_frontmatter.sh
mv .git/hooks/pre-commit update_frontmatter.sh
- สร้างไฟล์
.pre-commit-config.yamlที่ root ของ project ตามนี้
repos:
  - repo: local
    hooks:
      - id: update-frontmatter-datetime
        name: Update frontmatter datetime
        entry: bash update_frontmatter.sh
        language: system
        types: [markdown]
        stages: [commit]
        verbose: true
- repo: localเราจะใช้ hook ที่เขียนเองบนเครื่อง (ไม่ได้ดึงมาจาก remote repository)hooks:กำหนด hooks ต่าง ๆ ที่เราต้องการใช้งาน (มีได้หลายตัว)- id: update-frontmatter-datetimeกำหนด ID ของ hook นี้ ใช้อ้างอิงถึงได้name: Update frontmatter datetimeกำหนดชื่อของ hookentry: bash update_frontmatter.shกำหนด script ที่ต้องการรันด้วย hooklanguage: systemกำหนดภาษาที่ใช้ใน hook (ดูเพิ่มที่ hooks language)types: [markdown]ระบุประเภทไฟล์ที่ hook นี้จะถูกเรียกใช้ด้วย (ในที่นี้คือไฟล์.mdเท่านั้น)stages: [commit]ระบุ stage ของ Git ที่ต้องการให้ hook นี้ทำงาน (ในที่นี้คือจังหวะ commit)verbose: true: ให้แสดง output จาก script ด้วย
สรุปคือ configuration นี้กำหนดให้ pre-commit framework รัน script update_frontmatter.sh ทุกครั้งก่อนการ commit โดยจะรันกับไฟล์ Markdown (.md) ใน stage area เท่านั้น
ที่จริงผมสามารถปรับ Bash script ให้ใช้ชื่อไฟล์จาก framework ได้โดยใช้
pass_filenames: trueใน configuration แต่ผมขี้เกียจปรับ logic ใน code ใหม่บวกกับข้อจำกัดบางอย่างของเคสนี้ที่การ loop through จากgitcommand นั้นง่ายกว่า
- ใช้ pre-commit (framework) ช่วย generate
pre-commitscript ขึ้นมา
pre-commit install
สิ่งที่เรา configure ไว้มันจะถูกนำไปสร้างเป็น pre-commit hook ใน .git/hooks/ ให้
- ทดสอบการทำงานของ
pre-commithook ใหม่ด้วยการแก้ไขไฟล์myarticle1.mdแล้วลอง commit ดูครับ
git add myarticle1.md
git commit -m "test new pre-commit hook"
เมื่อเรารัน git commit มันจะเรียก pre-commit hook ที่เรากำหนดจากไฟล์ .pre-commit-config.yaml ซึ่งจะไปรัน Bash script ของเรา และถ้าทุกอย่างเรียบร้อยก็จะเห็นมันอัพเดท pubDatetime หรือ modDatetime ในไฟล์ที่เรา commit ไปให้ครับ
ในตัวอย่างที่ 2 นี้เราสามารถนำไฟล์ configuration และ script นี้ commit ขึ้น Git repository เพื่อให้คนอื่น ๆ ในทีมสามารถนำไปใช้ได้ทันทีโดยไม่ต้องมา copy script เองให้เสียเวลา
บทสรุป (Conclusion)
จะเห็นว่า Git hooks (โดยเฉพาะ pre-commit hook) นั้นมีประโยชน์มากในการช่วยเพิ่มประสิทธิภาพการทำงานและคุณภาพของ code ด้วยการทำ automation ตั้งแต่ก่อนการ commit เข้าไปใน Git repository
เราสามารถเขียน pre-commit script ขึ้นมาใช้เองได้ไม่ยาก ด้วยการสร้างไฟล์ pre-commit ใน .git/hooks/ และเขียน code ให้ทำงานตามที่เราต้องการ เช่น ตรวจสอบและปรับ code formatting, รัน automated tests, scan หาช่องโหว่ด้านความปลอดภัย และอื่น ๆ อีกมากมาย
อย่างไรก็ตามการใช้ pre-commit hook แบบธรรมดาก็มีข้อจำกัดในเรื่องของความยุ่งยากในการแชร์ให้กับคนในทีม, การอัพเดท/เพิ่ม hook ใหม่หรือการใช้ script จาก community ดังนั้นจึงมี frameworks ที่ถูกพัฒนาขึ้นมาเพื่อช่วยจัดการเรื่องพวกนี้ให้ง่ายขึ้นอย่าง pre-commit หรือ Husky ยังไงไปลองใช้กันดูครับ