Table of Contents#
- บทนำ (Introduction)
- Git Hooks คืออะไร? มีกี่แบบ?
- ทำความรู้จักกับ Git
pre-commitHook - Use Cases การนำ Git
pre-commitHook มาใช้ - วิธีการ Configure และใช้งาน Git
pre-commitHook - ตัวอย่าง 1: การใช้งาน Git
pre-commitHook - ข้อจำกัดของ
pre-commitHook แบบปกติ - แนะนำ Frameworks ที่ช่วยจัดการ Git Hooks ให้ง่ายขึ้น
- ตัวอย่าง 2: ใช้ pre-commit (Framework) ช่วยจัดการ
pre-commitHook - บทสรุป (Conclusion)
บทนำ (Introduction)#
กระบวนการพัฒนา software ทุกวันนี้มี tasks ซ้ำ ๆ ที่มีความซับซ้อนและกินเวลามากอยู่แทบทุกส่วน เหตุผลก็เพื่อให้ได้มาซึ่ง application ที่มีคุณภาพและปลอดภัย เช่น การตรวจสอบต่าง ๆ ภายใน code ซึ่งการที่เราจะต้องทำสิ่งเหล่านั้นด้วยตัวเองทั้งหมดก็เป็นอะไรที่ค่อนข้างท้าทาย
แต่เราสามารถใช้ประโยชน์จากความสามารถของ Git อย่าง “Git Hooks” เพื่อช่วยทำงานบางอย่างได้ โดยเฉพาะอย่างยิ่ง pre-commit hook ซึ่งเป็นการทำ automation ตั้งแต่ก่อน commit ซึ่งเป็นจุดที่เหมาะสมสำหรับการใช้ script เพื่อตรวจสอบหรือ transform code ก่อนจะมีการ commit code เข้าไปใน Git repository (กันไว้ย่อมดีกว่าแก้)
Git Hooks คืออะไร? มีกี่แบบ?#
Git hooks คือ script ที่จะรันโดยอัตโนมัติเมื่อมี event บางอย่างเกิดขึ้นใน Git เช่น การ commit, merge หรือ push โดยหลัก ๆ จะแบ่งออกเป็น 2 แบบคือ
1. Client-side Hooks (ทำงานฝั่ง Git Local)#
pre-commit: รันก่อน commitprepare-commit-msg: รันหลังสร้าง commit message แต่ก่อนจะเปิด editorcommit-msg: รันหลัง commit message ถูกสร้างเพื่อตรวจสอบ messagepost-commit: รันหลัง commit เสร็จสมบูรณ์pre-push: รันก่อน push ไปยัง remotepost-checkout: รันหลังจากมีการ checkout branch หรือ restore ไฟล์ใด ๆpre-rebase: รันก่อนมีการ rebase โดยสามารถใช้ป้องกันไม่ให้ทำ rebase กับ branch ที่ต้องการได้
2. Server-side Hooks (ทำงานฝั่ง Git Server)#
pre-receive: รันเมื่อ server รับ push เพื่อตรวจสอบก่อนupdate: คล้าย pre-receive แต่รันต่อ branchpost-receive: รันหลังจาก push เสร็จสมบูรณ์ เพื่อ notification หรือ update service อื่น ๆ
ซึ่งไฟล์ hooks พวกนี้จะอยู่ที่ directory .git/hooks/ และมีตัวอย่างให้ดูอยู่ใน directory นั่นแหละครับ ลอง ls -l .git/hooks/ ดูได้เลย หากจะใช้ก็แค่ลบ .sample ออก
ทำความรู้จักกับ Git pre-commit Hook#
pre-commit hook คือ script ที่จะถูกรันโดยอัตโนมัติก่อนการ commit (มาดักหลังจากที่เราใช้คำสั่ง git commit ไป) โดยเราสามารถเขียน script เพื่อตรวจสอบหรือปรับแต่ง code ก่อนที่จะถูก commit เข้าไปใน repository ได้ ซึ่งเป็นการป้องกันปัญหาตั้งแต่ต้นทาง
Use Cases การนำ Git pre-commit Hook มาใช้#
วิเคราะห์ Static Code:
- ตรวจสอบ/ปรับ indentation, spacing, line breaks
- ตรวจหา bugs, potential errors, code smells
- ใช้ Prettier, ESLint สำหรับ Javascript หรือ Black, PyLint สำหรับ Python
- ฝั่ง infrastructure เช่น Ansible Lint หรือของ Terraform อย่างคำสั่ง
terraform fmtและterraform validate
Automated Tests:
- รัน unit tests หรือ integration tests
- ตรวจสอบว่า changes ใหม่ไม่ทำให้เกิดปัญหากับฟังก์ชันที่มีอยู่
- แจ้งเตือน developer กรณีเจอ tests ไม่ผ่าน
Security และ Audit:
- รัน tools เพื่อตรวจสอบความปลอดภัยของ application หรือ infrastructure code
- ตรวจสอบ vulnerabilities หรือ insecure configurations
- ใช้ tools เช่น Checkov, Talisman หรือ Snyk
Sensitive Information:
- ตรวจหา passwords, keys, tokens หรือ API keys
- ป้องกันไม่ให้ commit ข้อมูล sensitive ขึ้น Git repository
- ใช้ tools เช่น gitleaks หรือ TruffleHog
Dependencies:
- ตรวจสอบการอัพเดท dependencies ต่าง ๆ
- เตือนกรณีที่มี dependencies version เก่าหรือมีความเสี่ยงด้านความปลอดภัย
- ใช้ tools เช่น SafetyCLI ใน Python หรือ
npm audit,yarn auditของ Node.js
Version Pinning:
- ตรวจสอบว่า version ของ tools และ dependencies ให้เป็นแบบ specific version
- ป้องกันปัญหาเรื่อง compatibility จากการอัพเดทของ dependencies ใน version ใหม่ ๆ
- เช่น การใช้ package-lock.json ใน Node.js หรือ Gemfile.lock ใน Ruby
Document และ Alert/Notification:
- สร้างหรืออัพเดท document อัตโนมัติ เช่น API documentation, README.md หรือ changelogs
- ส่ง notification ไปยัง chat หรือ email หากมีการ commit ที่สำคัญ
- ใช้ tools เช่น mkdocs หรือ Sphinx
วิธีการ Configure และใช้งาน Git pre-commit Hook#
- สร้างไฟล์ script ชื่อว่า
pre-commitใน.git/hooks/directory - เขียน script ตามที่ต้องการ เช่น Bash หรือ Python
- เซ็ต permission ให้ script สามารถรันได้ด้วย
chmod +x .git/hooks/pre-commit - ทุกครั้งที่เรารัน
git commitscript จะทำงานอัตโนมัติก่อน commit จริง
ซึ่งถ้า…
- script รันสำเร็จ (exit code เท่ากับ 0) ก็จะ commit
- script รันไม่สำเร็จ (exit code ไม่เท่ากับ 0) ก็จะยกเลิก commit นั้นไป
ตัวอย่าง 1: การใช้งาน Git pre-commit Hook#
ผมใช้ pre-commit hook นี้เพื่อช่วยในการเขียนบทความครับ โดยปกติแล้วผมจะเขียนบทความอยู่ในไฟล์ Markdown (*.md) และผมต้องการให้มันช่วยใส่ pubDatetime และ modDatetime ใน frontmatter ให้อัตโนมัติ โดยมีเงื่อนไขคือ…
- ถ้าผมสร้างไฟล์ใหม่เพื่อเขียนบทความ มันจะใส่
pubDatetimeให้ตามวันเวลาปัจจุบัน - ถ้าผมแก้ไขบทความและ commit ไป มันจะใส่
modDatetimeให้ตามวันเวลาปัจจุบัน - และทั้งสองกรณีจะต้องเป็น
draft: falseเท่านั้น เพราะถ้าเป็น draft ผมจะไม่บันทึกวันเวลา
รูปด้านล่างนี้เปรียบเทียบ flow ระหว่างการ “ใช้ และ ไม่ใช้” pre-commit hook
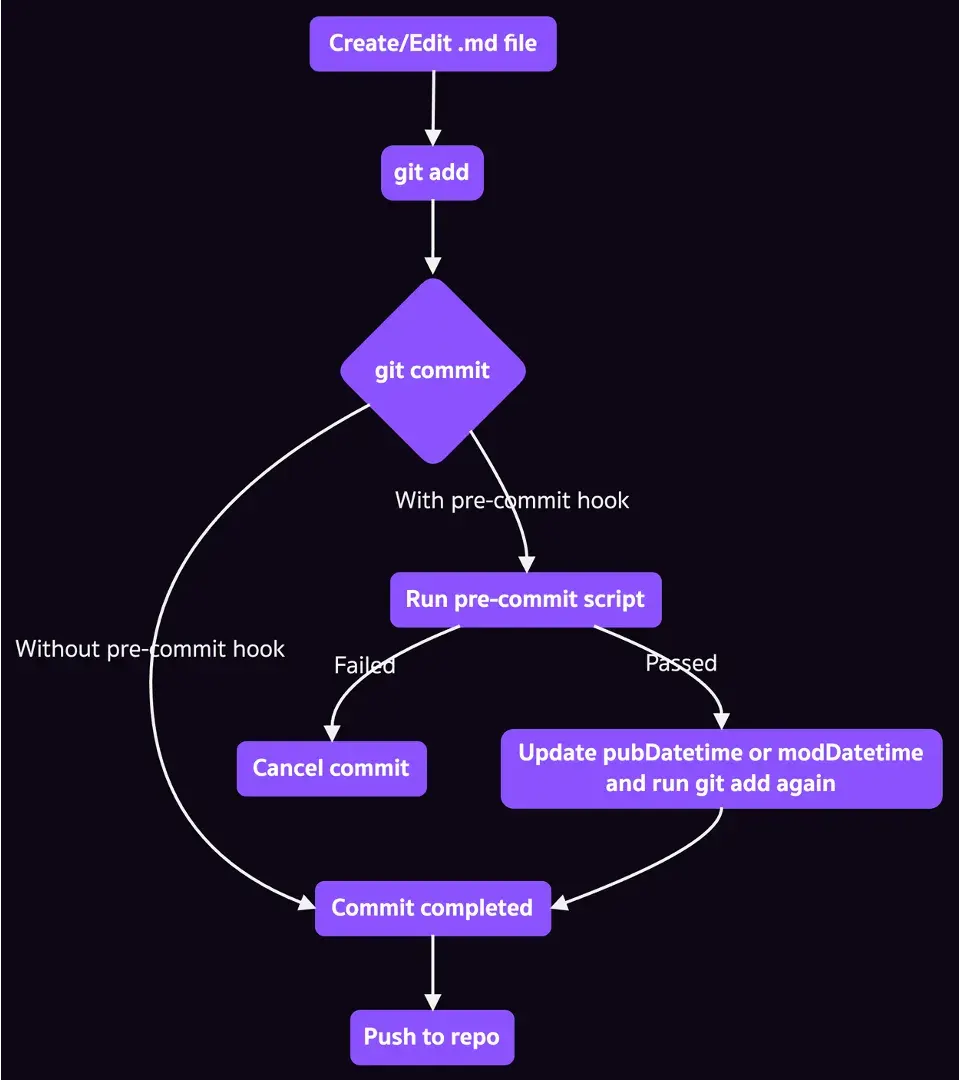
น่าจะพอเห็นภาพบ้างแล้ว งั้นไปดูวิธีการทำกันเลย (ลองทำตามได้นะครับ)
- หลังจากที่เรา
git initแล้ว ให้สร้างไฟล์pre-commitใน directory.git/hooks/และเขียน Bash script ตามนี้
#!/bin/bash
# Check if the file has the frontmatter
has_frontmatter() {
local file_path="$1"
local first_line=$(head -n 1 "$file_path")
local second_line=$(head -n 2 "$file_path" | tail -n 1)
if [[ $first_line != "---" || ! $second_line =~ author: ]]; then
return 1
fi
return 0
}
# Get the current UTC and Bangkok time
get_current_time() {
local utc_time=$(date -u "+%Y-%m-%dT%H:%M:%SZ")
local bkk_time=$(TZ="Asia/Bangkok" date "+%d %b %Y %H:%M:%S")
echo "$utc_time # $bkk_time (Bangkok)"
}
# Function to update the datetime field in frontmatter
update_datetime() {
local file="$1"
local file_status="$2"
local field="$3"
local current_time="$4"
# Split the file into frontmatter and content
csplit "$file" '/^---$/2' > /dev/null
# Update the frontmatter using appropriate sed command based on OS
if [[ "$OSTYPE" == "darwin"* ]]; then
sed -i '' "s/^$field:.*/$field: $current_time/" xx00
else
sed -i "s/^$field:.*/$field: $current_time/" xx00
fi
# Merge updated frontmatter and content
cat xx00 xx01 > temp_updated_file
# Update the original file
mv temp_updated_file "$file"
rm xx00 xx01
echo "- Updated $field for $file ($file_status)"
}
main() {
local changed_files="$1"
# Check if there are any changed files to process
if [ -n "$changed_files" ]; then
while read -r file_status file1 file2; do
# Determine the file path to process based on its status
# For renames (R status), use the new file name
local file_path=""
if [[ "$file_status" == "R"* ]]; then
file_path="$file2"
else
file_path="$file1"
fi
# Skip processing for deleted files, renames without changes,
# files without frontmatter, or draft files
if [[ "$file_status" == "D" || "$file_status" == "R100" ]] || \
! has_frontmatter "$file_path" || grep -q "^draft: true" "$file_path"; then
echo "- Skipping file: $file_path"
continue
# Set the field name to be updated in the frontmatter
# 'pubDatetime' for added files, 'modDatetime' for others
local field_name=""
elif [[ "$file_status" == "A" ]]; then
field_name="pubDatetime"
else
field_name="modDatetime"
fi
# Get the current time in UTC and Bangkok timezone
local current_time=$(get_current_time)
# Update the datetime field in the file's frontmatter
update_datetime "$file_path" "${file_status:0:1}" "$field_name" "$current_time"
# Stage the updated file for commit
git add "$file_path"
done <<< "$changed_files"
echo ""
echo "--------------------------------------------------------------------"
fi
}
# Get the status and paths of all changed markdown files
changed_files=$(git diff --cached --name-status \
| grep -iE "(^[AMD]|^R[0-9]{3}).*\.md$" \
| awk '{print $1, $2, $3}')
main "$changed_files"
- เซ็ต permission ของ script ให้เป็น executable (สามารถรันได้)
chmod +x .git/hooks/pre-commit
- กลับมาที่ working directory สร้างไฟล์บทความใหม่ชื่อ
myarticle1.mdและเขียนเนื้อหาลงไป
---
title: "My Article 1"
draft: false
pubDatetime:
modDatetime:
---
## Topic 1
Welcome to my new article
...
...
...
- เมื่อเขียนบทความเสร็จก็ save ไฟล์และรัน
git addจากนั้นก็git commit
git add myarticle1.md
git commit -m "add new article 1"
ปกติแล้วจะเป็นการ commit ไฟล์เข้า Git ทันที แต่เมื่อมี pre-commit script จังหวะที่เรา commit มันจะไป trigger ให้ Bash script ทำงาน โดยจะเห็น output ว่ามันมีการเพิ่ม pubDatetime ใน frontmatter ของไฟล์ myarticle1.md ก่อน จากนั้นจึงรัน git add อีกครั้งก่อนจะ commit
- Updated pubDatetime for myarticle1.md (A)
--------------------------------------------------------------------
[main a1b2c3d] add new article 1
1 file changed, 24 insertions(+)
create mode 100644 myarticle1.md
และเมื่อผมลองเปิดไฟล์ myarticle1.md ขึ้นมาดูก็จะเห็นว่า pubDatetime ถูกอัพเดทตามวันเวลาปัจจุบันแล้วเรียบร้อย
---
title: "My Article 1"
draft: false
pubDatetime: 2024-03-25T09:43:51Z # 25 Mar 2024 16:43:51 (Bangkok)
modDatetime:
---
## Topic 1
Welcome to my new article
...
...
...
ต่อมาเมื่อผมมีเหตุให้ต้องแก้ไขบทความ ผมก็ไม่ต้องใส่ modDatetime เอง แค่แก้ไขไฟล์แล้ว git add และ git commit ไปตามปกติ เจ้า pre-commit script ก็จะอัพเดท modDatetime ให้อัตโนมัติแบบนี้
---
title: "My Article 1"
draft: false
pubDatetime: 2024-03-25T09:43:51Z # 25 Mar 2024 16:43:51 (Bangkok)
modDatetime: 2024-03-26T11:48:36Z # 26 Mar 2024 18:48:36 (Bangkok)
---
## Topic 1
Welcome to my updated article
...
...
...
ข้อจำกัดของ pre-commit Hook แบบปกติ#
แม้ว่าเราจะสามารถเขียน pre-commit hook ขึ้นมาใช้เองได้ไม่ยากนัก แต่ก็มีข้อจำกัดบางประการ เช่น
- ต้องสร้างไฟล์
pre-commitใน.git/hooks/เอง - อัพเดทหรือเพิ่ม hook ใหม่ลำบาก ต้องแก้ในไฟล์ script เอง
- ติดตั้งและจัดการ tools หรือ dependencies ที่ใช้ใน hook เองทั้งหมด เช่น linter หรือ formatter
- แชร์ hook configuration ให้คนอื่นในทีมใช้ได้ยาก เพราะต้องนำ script ไปวางเอง
- ไม่สามารถใช้ hooks/scripts ที่มีคนเขียนไว้แล้วจาก community ได้
แนะนำ Frameworks ที่ช่วยจัดการ Git Hooks ให้ง่ายขึ้น#
เพื่อแก้ปัญหาข้อจำกัดต่าง ๆ ของการใช้ Git hooks แบบตรง ๆ ที่เราทำกันไป จึงมี framework (ที่จริงมันเหมือน wrapper แหละครับ) ที่ถูกพัฒนาขึ้นมาเพื่อช่วยให้แก้ปัญหาข้างต้น เช่น
- pre-commit: ช่วยจัดการ configuration ของ Git hooks ได้ง่ายขึ้น (ไม่ใช่แค่
pre-commitตามชื่อ) - Husky: ช่วยจัดการ hooks สำหรับ Node.js project (JavaScript หรือ TypeScript) ผ่าน
package.json
ตัวอย่าง 2: ใช้ pre-commit (Framework) ช่วยจัดการ pre-commit Hook#
ด้วยความยุ่งยากของการใช้ Git hooks โดยตรงแบบที่ผมได้อธิบายไป เดี๋ยว section นี้เราจะมาปรับ pre-commit hook ให้จัดการได้ง่ายขึ้นผ่าน framework ที่ชื่อว่า pre-commit กันครับ
- ติดตั้ง pre-commit (framework) ก่อน โดยเครื่องเราต้องมี Python ด้วยนะครับ
pip install pre-commit
- ย้ายไฟล์
.git/hooks/pre-commitไปไว้ที่ root ของ project แล้วเปลี่ยนชื่อเป็นupdate_frontmatter.sh
mv .git/hooks/pre-commit update_frontmatter.sh
- สร้างไฟล์
.pre-commit-config.yamlที่ root ของ project ตามนี้
repos:
- repo: local
hooks:
- id: update-frontmatter-datetime
name: Update frontmatter datetime
entry: bash update_frontmatter.sh
language: system
types: [markdown]
stages: [commit]
verbose: true
- repo: localเราจะใช้ hook ที่เขียนเองบนเครื่อง (ไม่ได้ดึงมาจาก remote repository)hooks:กำหนด hooks ต่าง ๆ ที่เราต้องการใช้งาน (มีได้หลายตัว)- id: update-frontmatter-datetimeกำหนด ID ของ hook นี้ ใช้อ้างอิงถึงได้name: Update frontmatter datetimeกำหนดชื่อของ hookentry: bash update_frontmatter.shกำหนด script ที่ต้องการรันด้วย hooklanguage: systemกำหนดภาษาที่ใช้ใน hook (ดูเพิ่มที่ hooks language)types: [markdown]ระบุประเภทไฟล์ที่ hook นี้จะถูกเรียกใช้ด้วย (ในที่นี้คือไฟล์.mdเท่านั้น)stages: [commit]ระบุ stage ของ Git ที่ต้องการให้ hook นี้ทำงาน (ในที่นี้คือจังหวะ commit)verbose: true: ให้แสดง output จาก script ด้วย
สรุปคือ configuration นี้กำหนดให้ pre-commit framework รัน script update_frontmatter.sh ทุกครั้งก่อนการ commit โดยจะรันกับไฟล์ Markdown (.md) ใน stage area เท่านั้น
ที่จริงผมสามารถปรับ Bash script ให้ใช้ชื่อไฟล์จาก framework ได้โดยใช้
pass_filenames: trueใน configuration แต่ผมขี้เกียจปรับ logic ใน code ใหม่บวกกับข้อจำกัดบางอย่างของเคสนี้ที่การ loop through จากgitcommand นั้นง่ายกว่า
- ใช้ pre-commit (framework) ช่วย generate
pre-commitscript ขึ้นมา
pre-commit install
สิ่งที่เรา configure ไว้มันจะถูกนำไปสร้างเป็น pre-commit hook ใน .git/hooks/ ให้
- ทดสอบการทำงานของ
pre-commithook ใหม่ด้วยการแก้ไขไฟล์myarticle1.mdแล้วลอง commit ดูครับ
git add myarticle1.md
git commit -m "test new pre-commit hook"
เมื่อเรารัน git commit มันจะเรียก pre-commit hook ที่เรากำหนดจากไฟล์ .pre-commit-config.yaml ซึ่งจะไปรัน Bash script ของเรา และถ้าทุกอย่างเรียบร้อยก็จะเห็นมันอัพเดท pubDatetime หรือ modDatetime ในไฟล์ที่เรา commit ไปให้ครับ
ในตัวอย่างที่ 2 นี้เราสามารถนำไฟล์ configuration และ script นี้ commit ขึ้น Git repository เพื่อให้คนอื่น ๆ ในทีมสามารถนำไปใช้ได้ทันทีโดยไม่ต้องมา copy script เองให้เสียเวลา
บทสรุป (Conclusion)#
จะเห็นว่า Git hooks (โดยเฉพาะ pre-commit hook) นั้นมีประโยชน์มากในการช่วยเพิ่มประสิทธิภาพการทำงานและคุณภาพของ code ด้วยการทำ automation ตั้งแต่ก่อนการ commit เข้าไปใน Git repository
เราสามารถเขียน pre-commit script ขึ้นมาใช้เองได้ไม่ยาก ด้วยการสร้างไฟล์ pre-commit ใน .git/hooks/ และเขียน code ให้ทำงานตามที่เราต้องการ เช่น ตรวจสอบและปรับ code formatting, รัน automated tests, scan หาช่องโหว่ด้านความปลอดภัย และอื่น ๆ อีกมากมาย
อย่างไรก็ตามการใช้ pre-commit hook แบบธรรมดาก็มีข้อจำกัดในเรื่องของความยุ่งยากในการแชร์ให้กับคนในทีม, การอัพเดท/เพิ่ม hook ใหม่หรือการใช้ script จาก community ดังนั้นจึงมี frameworks ที่ถูกพัฒนาขึ้นมาเพื่อช่วยจัดการเรื่องพวกนี้ให้ง่ายขึ้นอย่าง pre-commit หรือ Husky ยังไงไปลองใช้กันดูครับ